Seo Rocket Blogger Template Installation Documentation
A step to step guide to help you out to set up your Seo Rocket Blogger Template in easy way.
Blogger Template Installation Steps:-
1. Backup & Uploading
- Unzip the Template.zip file.
- On Blogger Dashboard Click Template.
- Click on Download Full Template to keep your old template.
- Click Browse… button. Find where the “seorocket-full-version.xml” file location.
- Then Click Upload.
- Edit mobile Preview. (follow images)
2. Blog Setting
After installing the theme, there are minimum settings to make all widgets work fine in this template.
- On Blogger Dashboard Click Settings.
- Click Other.
- In Site Feed > Allow Blog Feed Choose Full.
- Then Click Save settings.
3. Logo Setup
2. Upload Your Logo Header : In You Blog (Header), Click on “Edit” and applicate all settings below :
4. Navigation Menu
4.1 Top Menu Setup
- On Blogger Dashboard Click Layout.
- Click Edit on Top Navigation Widget.
- Change it according to your needs. Add name of the link Name and link url then click add Link
- Click Save.
- Change the location of menu item using arrow down and arrow up Icon
4.2 Main Menu/DropDown
- On Blogger Dashboard Click Layout.
- Click Edit on Main Menu Widget.
- Change it according to your needs. Add name of the link Name and link url then click add Link
- Click Save.
- To Add sub menu Item. You have to add “_”(underscore without quotes) before Menu item Link (example : _Left Sidebar)
- Change the location of menu item using arrow down and arrow up Icon
5. Social Top / Social Footer
Access your blog Layout > click Edit link on Social Top / Follow Us (Sidebar) / Social Footer widget.
Social Names: facebook, twitter, gplus, bloglovin, rss, youtube, skype, stumbleupon, tumblr, vine, stack-overflow, linkedin, dribbble, soundcloud, behance, digg, instagram, pinterest, delicious, codepen
Example:
For Example if you have to add “facebook” icon then just add facebook in name of New site name section and below add url of that particular site.
6. Featured Posts
When you are writing a post add “featured” word as a label in your post. In which post you add these label that post automatically add a Badge on the corner of the post.
Make sure you write “featured” not “Featured” it is case sensitive and same for the popular
Image Example:
6. Featured Posts
Access your blog Layout > click Add a Gadget > HTML/JavaScript on Feat Section section,and add the desired category/label name.
Example:
Now enter single label as shown in the below image. Make sure you have entered the label correctly as Labels are case-sensitive.
Enter the label that you’ve used in the posts as shown below:
7. Widgets
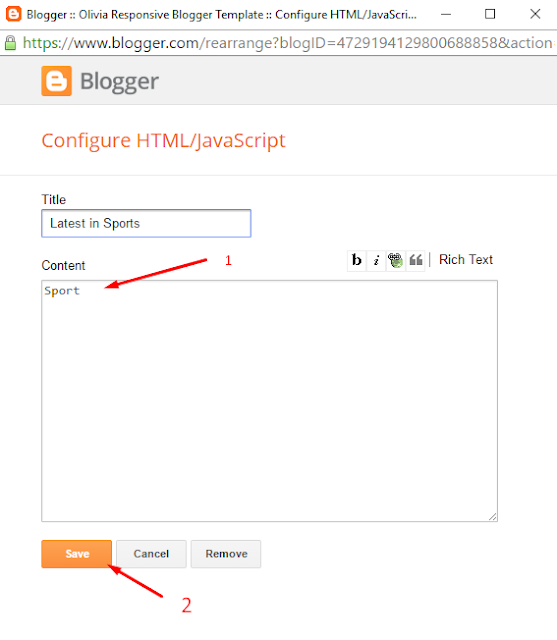
Access your blog Layout > click Add a Gadget > HTML/JavaScript on Sidebar or Footer section, you must place the following names highlighted in blue below.
Recent Posts: recentposts
Random Posts: randomposts
After add, click save.
8. Theme option:
Add your desired number to change the count of recent posts widget.
Add your desired number to change the count of recent posts widget.
Add your desired number to change the count of main posts.
- Label Max-Results Results No.
Add your desired number to change the count of posts on label pages.
9.Comments System
Access your blog Layout > click Edit link on Comments system widget.
You can trigger the provisions below.
Only Blogger add: [blogger] and click save!
Only Disqus add: [disqus] and click save!
Only Facebook add: [facebook] and click save!
More:[facebook][disqusss]
[blogger][facebook]
[facebook][blogger]
[disqus][facebook][blogger]
[blogger][disqus][facebook]
[disqus][blogger][facebook]
NOTE: The display of all is only available in that provision.
NOTE 02: To view the system Disqus comments, you need to follow the steps below.
Disqus Shortname
Access your blog Layout > click Edit link on Disqus Shortname widget.
- What you have to do is just add the shortname
10. Page Layout / No Sidebar / Left Sidebar
To add these options just add the codes below in the composition of the post!
Codes: [no-sidebar]
[left-sidebar]
Image Example:
11. Theme Customization
Access your blog Template > click Customize.Here you can change the background, and apply pre-defined colors
Clicking Advanced You will see the official option to change the Main Color


No comments:
New comments are not allowed.